How to Add Country Restrictions on Your Facebook Fan or Business Page
Country Restrictions on Your Facebook Page
When you own a Facebook page, you control all of the restrictions involved if you’re the administrator. In fact, all of the settings on your page are up to you if you’re the administrator.
If you feel the need to set up country restrictions on your page, then follow these simple instructions.
1. To get to your Facebook, you can find a link to it on the left side of the Facebook homepage. It should be under the heading ‘favorites.’
2. At the top right corner of your page there is a tab called ‘settings.’ That’s where you need to click next.
3. Once you’ve been directed to the settings page, a list of tabs will be on the left side. One of the tabs at the top is entitled ‘general.’ If you’re not already there, click on it.
4. Scroll down, and once you get halfway down the page you will see an option that says ‘country restrictions.’ On the right side of that option will be a blue ‘edit’ button to click on.
5. After clicking edit, the section will expand.
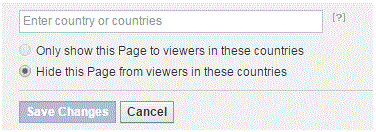
At the top of the section, type in the names of the countries you want to restrict. You can also type in names of countries that you want the page to be displayed to.
6. Below the text box are two options. Click on the top one if the countries that you typed in are allowed to view the page. Click the bottom one if the countries that you typed in aren’t allowed to see the page. After that, you can click ‘save changes.’
Your new preferences will immediately be saved. Your page will no longer be seen by people from the countries that you restricted. Or, the page will only be seen by a certain group of countries. This all depends on the options you picked.
Read more
- How to Make Voice and Video Calls on Facebook
- How to Mute a Conversation on Facebook
- How to Add Effects to Facebook Photos and Contacts
- How to Delete Imported Contacts on Facebook Phonebook
- How to Move Instant Messaging Window on Facebook
- I Can Not Open or Send Messages on Facebook
- How to Disable Photo Auto-Enhancer on Facebook using Android Phone
- How to Manage the About Page on Facebook
- How to Attach a Blog to your Facebook Account


